One advantage of using a program like Dreamweaver – as opposed to a simple text editor – is that it has some built-in functions that make complicated web page effects quite simple to implement. In this section you learn about image maps, Library items, and templates.
Image Maps
Sometimes, you will want to create a web page that uses an image that allows people to click on a region and be taken to a different page. There are two ways to do this. The first is simply to cut your image into small pieces using an image-editing application such as Adobe Photoshop, and then reassemble those pieces into a visual whole using HTML. Each image piece can then be linked to the appropriate page. This works well for images that only need to be divided into a few pieces and that can be cut into convenient rectangular blocks.
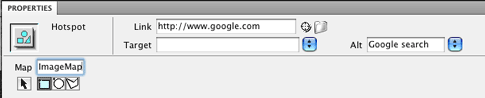
Sometimes, though, you simply can’t cut an image into small enough or detailed enough pieces this way. In that case, an image map is the way to go. Leave your image intact and use HTML to define regions of the image that are clickable to your corresponding pages. A good example is a map of the United States. The irregular shapes of the states don’t make it a good candidate for being sliced into rectangles by an image-editing program. With an image map, however, you can trace the outline of each state and then make each state clickable to a different web page. Dreamweaver calls these clickable shapes “hotspots.”
Here’s how:
- Fill in the Alt (alternative) text to use for the hotspot.
- To create another hotspot, choose the hotspot shape from the image map tools in the Properties palette that is best suited for outlining your particular image. Note: If you select the polygon hotspot tool
 , you need only click once at each corner of the shape you are outlining to form your linkable image. You don’t need to click and drag the shape out to your preferred size as you have to do with the rectangular and oval hotspot tools.
 - Repeat as many times as desired to set all your hotspots.
Library Items
Most pages of a website contain common elements that show up in the same location and look the same on each page. Examples might include:
- The logo or branding
- The navigation bar
- A copyright notice
Don’t confuse these common elements with a common layout or page structure. It’s true that most websites have similar page layouts from page to page. These are best handled by templates.
Say you have 50 pages with the same navigation bar and everything is working just fine – until you need to add a new item to that navigation bar. Suddenly you’re not talking about simply creating a new web page; you’re talking about editing 50 pages so that they all link to the new item. What a hassle! But Dreamweaver has a quick solution.
You can use Dreamweaver to turn these common elements into Library items. Create a single Library item and then reuse it on each page where that element needs to appear. When you need to make an edit, it’s simply a matter of opening the Library item, making the edit and letting Dreamweaver replicate that edit across all the pages containing the Library item.
You can create a Library item out of a block of text, a single image or a block of images and HTML. They can be small or large. The only thing to remember is that you can only use Library items for elements that won’t change from page to page.
Ready to try it? The first step is to create a Library item:
- Select the item or items in your web page that you want to turn into a Library item.
- Choose Library > Add Object to Library from the Modify menu. Dreamweaver opens the Assets tab in the Files menu and inserts the new Library item in it.
- Give the new Library item an easily recognized
 name.
name. - Repeat as necessary for all the items you want to turn into Library items.
Next, you need to insert your Library item into the web pages where it should appear.
- Open or create the HTML page that will contain your Library item.
- Click in the location on the page where you want to insert the Library item.
- Open the Assets tab from the Windows menu. Dreamweaver displays the Assets tab in the Files palette. If your Library items aren’t visible, select Library (looks like an open book
 ) from the tools on the window’s left side.
 - Select the Library item you want to place in your page.
- Click the Insert button
 at the bottom of the window. Dreamweaver places the Library item in your page, highlighting it in yellow to let you know visually that it is a Library item. (This highlighting won’t be visible when you view the page in a web browser.)
 - Repeat as necessary to place more Library items in this or in other web pages.
The real power of Library items becomes evident when you edit one:
- Open the Assets tab from the Windows menu. Dreamweaver opens the Assets tab in the Files palette. If your Library items aren’t visible, click Library from the tool icons on the left side of the window.
- Double-click the Library item you want to edit. Dreamweaver opens the item in the main work space.
- You can update text, add an image or remove an image.
- Choose Save from the File menu. Dreamweaver saves the Library item and brings up the Update Library Items dialog box.
- The Update Library Items box lists all the files that contain your Library item. When you click Update, Dreamweaver replicates your edit across all the files listed. Dreamweaver also shows you the Update Pages window with details about the files that were updated. Click Close when you are finished.
It’s very easy to forget that all the files that contained the uploaded Library item need to be uploaded to your website! Don’t forget this important final step.
Templates
Templates should be a common concept to most computer users, but if you’re unfamiliar with the idea, here is an easy real-world analogy. Think of letterhead stationery as a template. Imagine a piece of letterhead that has a company logo in the top left corner, followed by the address. At the bottom left, the URL is displayed. Now imagine using a piece of the stationery. To the right of the logo and address, you type your letter or memo. That letterhead is effectively a template — a consistently used layout that gives a uniform appearance to every letter you create.
Now go to a popular news website and start clicking through the site. You will quickly notice that similar types of pages often have a similar layout, even though individual elements, or the “meat” of the page, change from page to page. For example, all news stories may look essentially the same, even though the headline, byline and text changes, and some may include photos. Those pages are created using templates that ensure consistency for all the elements displayed. They are an invaluable part of any large website’s production, because they allow content to flow smoothly and quickly onto the website. Just think how time consuming it would be to have to build a web page from scratch when you are publishing 20 new stories every day.
The trick with a template is to think through the content of your website’s pages to determine where you can use templates, and how to build those individual templates. A typical news publishing operation might create the following types of templates:
- Main section page template. This page would list all the stories in a given newspaper section, perhaps with some descriptive information like a headline, byline, thumbnail, deck head or subhead.
- Story page template. This page would contain all the pieces of a story: headline, byline, deck, text, links, resource documents, multimedia and photos.
- Main photo gallery page template. This page would show thumbnails of all the photos in a photo gallery with links to each.
- Individual photo gallery page template. This page would show a large photo contained in a gallery, with text, credit and navigation elements to the gallery’s previous and next photos.
- Special report template. This page might contain a spot for a large graphic treatment (headline and representative image), a top story and all the supporting stories and resources that are part of the report.
Unlike letterhead stationery, web templates are editable. The whole idea of a web template is that you can merrily build your website and produce new pages that are all consistent. Then, when you need to change the look of your layout, you can simply update the template. Every page that uses the template is also updated, making changes across your entire website without your having to edit every page yourself. So you can add new sections, change your branding, insert a new ad slot, or redesign your site very easily.
If you’re already using Library items, remember that your Templates can include Library items. This is handy if you have some pages created by Templates and some that aren’t and want to use a common element, such as a logo, between these two kinds of pages.
Templates also offer a big advantage when you have multiple web editors making and editing pages. Even if they work in different offices or in shifts that don’t overlap, they will produce pages that look alike and contain all the necessary elements. Editing is also easier because they don’t have to figure out another editor’s code.
It’s worth noting that while templates can be incredibly helpful, they are also, by nature, limiting. The layout and template elements often can’t be changed on a page-by-page basis without losing the ability to update the template automatically. In some instances, you will find that a template keeps you from putting a graphic where you want to or placing a certain size photograph. If this happens, you have a couple of choices:
- Don’t use the template for that page but remember that the more “custom” pages on your website, the more onerous it will be to make site-wide changes. You will need to update all “custom” pages individually.
- Create a new template that permits the change you want to make. This makes a lot of sense if you plan to use the new layout repeatedly.
- Conform to the template requirements. It’s not as much fun, but you’ll be thankful if you ever decide to redesign your website.
Most content management tools (such as blog software) use some kind of template system. With Dreamweaver, you can set up your own templates and make changes to them.
Any template should contain elements that are locked from page to page and therefore can’t be edited by a person using the template. The creator of the template determines what should be editable and what should not change.
When some elements need to be present on each page but may need to change from day to day to accommodate news developments, Dreamweaver templates can allow for some flexibility by giving options:
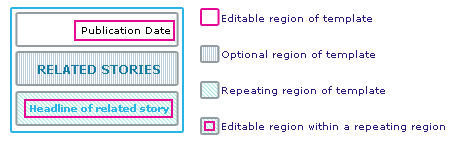
- Editable regions. An editor can fill in an editable region to suit the page being created. Editable regions can contain anything: text, images, links or tables. You would need a separate editable region for each element.
- Repeating regions. An editor can repeat these regions as needed. For example, if all your news stories contained one image, but some had more than one, you might create a repeating editable region so that an editor could place three images instead of just one. Note that for each element you want to put into your repeating editable region, you need to create a separate editable region within your repeating editable region.
- Optional regions. An editor can display these areas as needed. For example, to give a web editor the option of displaying a bullet in front of a sub-headline, you could create an optional region containing the bullet that can be turned on or off. Note that if you want something in the optional region to be editable, you need to create a separate editable region for that content. In the example given, the bullet would appear if you turn the optional region on, but you would create another editable region within this optional region for the text that would follow it.
- Editable tag attribute. Some templates include standard elements that vary on some pages. For example, all news section pages might have a graphic name of the section (News, Sports, Business), but that graphic will differ by section. By including the HTML for the image and allowing the template user to edit the source attribute, you ensure that the image exists on all pages but can be customized for each section.
To create a new template and add editable regions:
Choose New from the File menu. Dreamweaver opens the New Document window.
- Select Basic page from the category list and HTML template from the Basic page type list.
- Click Create.
- Build your page, including all the elements that need to exist. For example, if you are building a template for a news story, be sure to include all possible content that page could contain, such as the logo, advertisement spots, navigation bars, headline, deck, byline, story text, spots for photos and other resources and copyright. To get an idea of how spacing on your site would work, you can use placeholder content for elements that would later be replaced when the template is used.
- Highlight a region that you want to be editable by a web editor. For example, the headline. Select Template Objects > Editable Region from the Insert menu. Dreamweaver opens the New Editable Region window.
- Give the region a logical name. Click OK. Dreamweaver closes the window and inserts the new editable region in the template. You can see it outlined in blue and labeled with its name. (The label and outline won’t be visible when the page is viewed in a web browser.)
- Repeat as necessary to handle all the editable regions in your template. You can use the same process to add repeating editable regions.
- When you are finished, click Save from the File menu. Dreamweaver opens the Save as Template window.
- Give your template a name that will make sense to your web editors and click Save. Dreamweaver saves the template and closes the window.
To create optional editable regions:
- Open or create a template.
- Click and drag over the area you want to define as optionally editable.
- Choose Template Objects > Optional Region from the Insert menu. Dreamweaver opens the New Optional Region window.
- Name the region and select whether it should be visible by default when the template is used.
- Click OK. Dreamweaver closes the New Optional Region window and outlines the new region in your template in blue.
Some optional regions can be activated when another region has been edited. For example, if you create an optional region that can contain a photo if one is available, you can create a second optional region for the caption of that photograph. When a web editor uses the optional region for the photo, the photo caption region is shown.
Here’s an example of a set of editable, optional and repeating regions working together. The set up is this: To the right of my news story, I have a table that shows the publication date. Below that, I want my editors to be able to insert links to related stories, if there are any.
 To create editable tag attributes for any HTML tag (i.e. images, links, table widths or alignment, etc.):
- Select the HTML element for which you want to create an editable attribute. This may involve opening the Code or Split views so that you can isolate the HTML tag you want to affect.
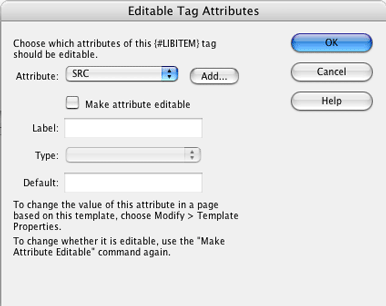
- Select Templates > Make Attribute Editable from the Modify menu. Dreamweaver opens the Editable Tag Attributes window.
- Look for the attribute you want to edit in the Attribute pull-down menu. If it is visible, select it. If not, click Add to the right nad enter the attribute you want to edit. Remember, the attribute needs to be readable in HTML.
- Check the Make Attribute Editable box.
- Give the editable attribute an identifying name in the Label box (for example, sectionheader_source).
- Scroll through the types of values (these will change depending on the tag you are applying the editable attribute to) you want to edit for the attribute. Using Text will allow the template user to type a value. Choosing URL allows the user to insert a link to an image. Choosing Color allows the user to use the Dreamweaver color palette to choose a color. Number allows the user to enter a numeric value like a height or width.
- Depending on which value you chose, fill out the default attribute value (What does this do? – Jan) in the Default box. (Again, you are working with the HTML source code.) It’s a good idea to have a default value that permits the page to look good even if the user doesn’t edit this region.
- Click OK. Dreamweaver closes the Editable Tag Attributes window.
Now that you have created and saved your template, it’s time to use it to make a page. Here’s how:
- Click New from the File menu. Dreamweaver opens the New Document window.
- Select the Templates tab.
- If you have more than one website defined in Dreamweaver, choose the website that contains the template you want to use from the Templates menu.
- Select the template you are using from the Site menu.
- Click Create. Dreamweaver closes the window and opens a web page based on the template you just selected.
- Choose Save from the File menu.
- Give your page a name and save it to the appropriate spot in your web folder.
Changing a template-based page is pretty simple. Editable regions are visible in the web page as blue outlines. You can simply click inside the outline and enter your content. If there is placeholder text, you may want to delete it. Editing tag attributes and optional regions is a little different:
- Select Template Properties from the Modify menu. Dreamweaver opens the Templates Properties window.
- To turn on or off display of an optional region, select it from the list, and click the Show… checkbox.
- To edit an editable tag attribute, select it from the list and fill in the box shown below the list of template properties. (The options here will vary depending on the settings of the editable attribute).
- Click OK when you are finished. Dreamweaver closes the Template Properties window and displays the changes you have made.
Repeating editable regions are quite simple to use. You can add or subtract repeating regions by using the plus and minus signs displayed next to the region.
We promised at the beginning of this section that you could update a template and replicate your changes across all files built with that template. Here’s how:
- Click Open from the File menu. Dreamweaver opens the Open window.
- Find the Templates directory in your website folder and open it. Select the template you want to edit and click Open. Dreamweaver opens the template in the work space.
- Make your change: Add new content, delete content or add or remove editable regions and tag attributes.
- Choose Save from the File menu. Dreamweaver saves the template and opens the Update Template Files window.
- This window shows the list of all files that use this template. Click Update, and Dreamweaver will make your template changes across all the files listed, showing progress and details in the Update Pages window.
- Click Close in the Update Pages window when all your pages are updated.
Don’t forget to upload all the pages that have been updated to your website, or no one will see them.