Many different programs let you create and edit web pages. They offer some advantages over coding pages in HTML:
- They let you place photos and text exactly where you want them to go.
- They let you see what your pages will look like as you edit them.
- They apply a uniform look to all your site’s pages.
Some programs offer better options for color, style and overall look. Look at the Buying Software section to see some recommendations.
This tutorial was created using Adobe Dreamweaver CS4, however the instructions should work with the newest version, Adobe Dreamweaver CS5, released in Mid-2010. Dreamweaver is one of the best and most popular web editing programs on the market. Adobe lets you try the program free for 30 days. We recommend that you download the free trial and use it for this tutorial. If you decide to buy the full version, you’ll be able to apply what you’ve learned here.
Dreamweaver lets you edit a page in two ways – either in Design view which allows visual editing or Code view which allows code editing – or a combination of the two, which is called Split view. Visual editing lets you cut and paste text, photos, multimedia and other elements onto a page and view the changes as you go, much like editing a word-processing document. Code editing requires you to alter a page’s HTML code to dictate placement of content and design. Using Split view where you see both is the best way to learn how the code is affecting your design.
Using the split view also gives you the best of both options. While visual editing is more convenient, programs like Dreamweaver can layer in complicated or unnecessary code that slows down users’ loading time. A designer who edits code directly often uses cleaner code that can help pages download faster. Many designers switch between visual and code editing to make the best use of both.
For example, if you want to decrease white space around a photo or wrap your text a certain way around a graphic, code editing would deliver more precise results than simply cutting and pasting.
One plus: Dreamweaver makes it easier to manage files on large, complex websites. The ability to transfer files to and from your web server is built into the program. Also, if more than one person is maintaining your site, Dreamweaver can track who has edited each file.
Setting Up a Local Folder
To use Dreamweaver most effectively, you need to set up a folder on your computer where you will store copies of all your website’s files. Think of this as the “dress rehearsal” for your website – a place to test changes and new additions to your pages before showing them to thousands of potential readers.
To create your local folder on your desktop, or wherever you keep your documents:
- Use the “new folder” function on your computer.
New Folder: To create a new folder, go to the folder on your hard drive or local server where you want it to go and click “new folder.” On PCs, this is on the left side of the window. On Macs you will need to click the gear icon at the top of the window.
- Name it something like Webdocs to signal that it contains your web files.
- Locate all the files that make up your web site and drag them to the folder.
If you use other programs like Word to write copy or Photoshop to create images for your site, store these files in a different folder than your main web folder. This helps keep the structure of your website clear and logical and prevents files from accidentally getting uploaded to your site.
A note on nomenclature: As your website grows, you will need to find files and update information; keep this in mind when naming your files. For example, if you save all your images in one massive file, it would be a pain to find a single image to update it, especially if you named it TopImage03. Instead type making your filenames relevant to the content. Additionally, even if you do use folders your website could become more and more complex. Try to have a standard way to name your files use underscores “_” or dots “.” to separate pieces of your name. To name an image of a red car jumping a ramp for an annual festival you could name it “Car01″ but that could mean anything. Instead, take the relevance and try something like, “2010Fest_RedCarJump.” The important thing is to be able to find your files without unnecessary legwork. An easy way to do that is to think through the organization early on.
Defining a Site
Once you’ve created this “local” folder, you’ll need to tell Dreamweaver where to find it and establish a way to connect that local folder to its duplicate on your web server. In Dreamweaver, this is called defining a site.
To define your site, you’ll need the following pieces of information. If you don’t have this information handy, ask your network administrator or check the welcome e-mails you received when you first signed up for web hosting:
Your FTP server’s protocol for identifying file names. File transfer protocol, or FTP, is a way to send files back and forth from your computer to your web server. In this case, your FTP server and your web server are the same. Server names usually look like one of these:
- domainname.com
- http://www.domainname.com
- ftp.domainname.com
The convention for naming is determined by the system administrator who set up the server. It doesn’t affect how your site will function.
Username. To connect to an FTP server, you need to have a unique user name. Most servers allow multiple users. If more than one person will be maintaining your site, it can be helpful to set up different accounts for each user in order to track which files they edit and manage.
Password. Without a secure password, anyone can hack into your web server and steal, delete or alter your files. When choosing a password, avoid using your child’s or pet’s name, your birthday or other easily obtainable information. A secure password should contain a random collection of letters and numbers. A better one includes both uppercase and lowercase letters. A password should be at least six characters long. If possible, change your password every six months to keep people from figuring it out.
Initial remote directory. Most web servers host more than one website so they instruct clients to place their web content in particular directories or folders on the web server. For example, your initial remote directory might look like this:
/public_html/
 When you have created your local folder and have gathered all this information, open Dreamweaver and look for the Site menu at the top of the application.
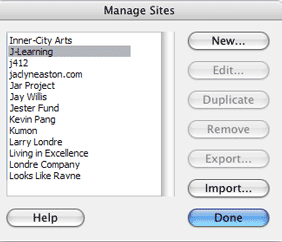
- Choose Manage Sites to open the Site window. Dreamweaver is designed to define and manage multiple websites. The Manage Sites dialog box lets you edit the connection information for any sites you are maintaining.
- Within the Manage Sites dialog box, select New and then Site. The Site Definition dialog box will open.
- Select the Basic tab from the Site Definition dialog box.
- Give your site a descriptive name that will be easy to pick out from a list of websites. This name will never be visible to your website visitors. When you’re finished, click Next.
- Dreamweaver now asks if you want to use a “server technology,” some sophisticated websites use special programs to make them dynamic, meaning they have database-driven content management systems to manage their files and content. If you will be creating your site without hiring a third-party designer, you will most likely not be using any of these programs. Unless you have hired a third-party designer and they instruct you otherwise, choose “No, I do not want to use a server technology,” then click Next.
- Choose whether you will edit your web pages on your own computer and upload them when you are ready (we recommend this) or whether you would like to edit the pages directly on the website. Editing on your own computer allows you to create test pages and catch design and editing mistakes before the page is up for everyone to see.
- Click the folder icon next to the question “Where on your computer do you want to store your files?” This will open a dialog box you can use to tell Dreamweaver where it can find your local folder. Once you have found it, click Open and then Select. You will be returned to the Site Definition dialog box and can click Next.
- Choose FTP from the “How do you connect to your remote server?” pull-down menu.
- Refer to the FTP information you have collected and fill in the server name (hostname or FTP address), initial remote directory (The folder on the server where you will store your files. This is not the same as your local folder.), FTP login (also known as the username) and password. If you click the Save box next to the password field, your password will be saved and you will never need to re-enter it. This can save time but also means that anyone using your computer can edit the website without knowing your password.
- Click Test Connection to see whether Dreamweaver is able to make FTP contact with your web server. If an error occurs, recheck your FTP information and try again. If your connection test is successful, click Next.
If you still cannot connect after rechecking your FTP information, contact your network administrator or check the welcome e-mails you received when you first signed up for web hosting. It is best to record your FTP information, usernames and passwords and keep it in a safe place.
- Dreamweaver’s “check in/check out” function is ideal for situations where multiple web editors will be working on the same website. If you are the only person who will be making edits, choose No and click Next to proceed to the next step. If more than one person will be editing your website, choose Yes and then fill in your name and e-mail address. This will prevent others from working on files you are working on – or have checked out – and let you know who is working on checked-out files. Click Next when you have finished.
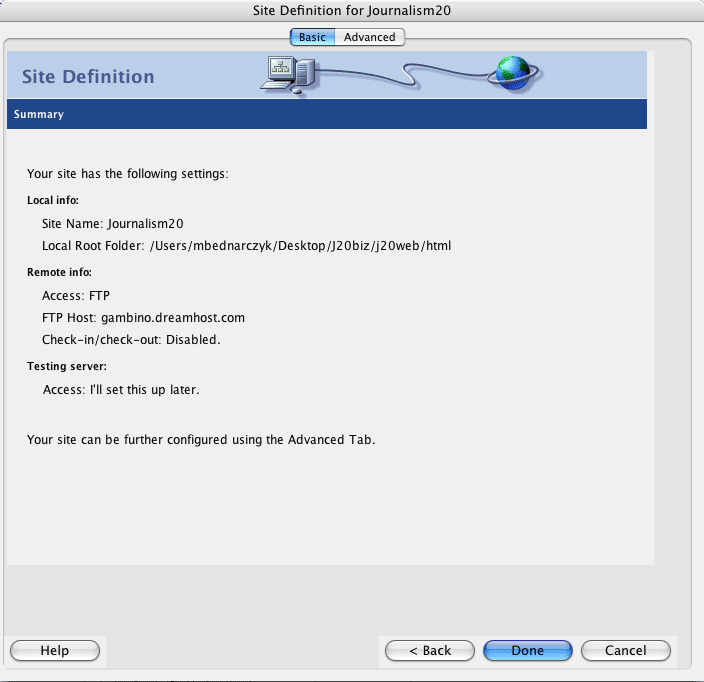
- Congratulations! You have finished defining a website in Dreamweaver. You will not need to do this again on this computer for this website. Click Done.
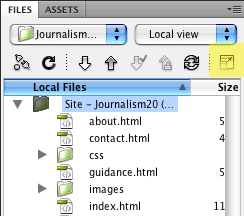 A handy tool to know about is called Site Files, which you can access from Files window on the bottom right corner of the screen (see sample image atright). Click the Expand/Collapse icon
 ![]() (highlighted in yellow below) and the window will do just that: expand into the middle of you screen (see sample image below).
(highlighted in yellow below) and the window will do just that: expand into the middle of you screen (see sample image below).
After you connect to your web server, the left side of the screen will all the files stored on your web server, known as Remote. The right half lists all the files in your Local directory, allowing easy comparison.
