Small animations can be created directly in Photoshop by using animation tools provided in Image Ready, a tool created by Adobe so Web designers can create animated GIFs. But be warned: animated GIFs are to be use sparingly. Inappropriate use of animations on a web page will annoy readers and drive them from your site.
Only the GIF format is capable of being used for animations, so remember that images that don’t look good as a GIF, such as detailed photographs, may not work well as animated GIFs.
![]()
Animated GIFs are suitable for tiny animations like arrows, bullets and other small visual flourishes. Don’t expect to create a 10-minute animation showing your viewer how to install a water faucet using an animated GIF. The resulting file would simply be too huge to download reasonably. Macromedia Flash or Swish are better options for extended animations of that kind.
An animated GIF is actually a series of images, or frames, that play in sequence. This playback gives you the impression of movement. So creating an animated GIF is essentially about creating the frames that make up the motion and then setting when and for how long each frame should be visible.
Here’s how to use Image Ready to create an animated GIF. This function is only available in the full version of Photoshop:
- Create a new Photoshop document and use the Text tool to type a > sign in your document.
- Choose Layer > Duplicate Layer twice to create two copies of your text layer.
- Move the second and third layers using the Move tool (
 )to position them one after the other: > > > in your document.
 - Turn the visibility of the second and third layers off by clicking the eye symbol (
 ) next to the layer thumbnail in the Layers palette.
 - Click Jump to Image Ready (
 ) in the toolbox. Photoshop launches Image Ready and opens the document you just created.
 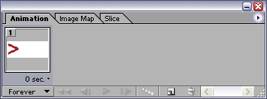 In Image Ready you will be working with three windows – the Photoshop document, the Animation palette and the Layers palette. To begin, your animation has only one frame. Click the Duplicate Current Frame icon (
 ) in the Animationpalette twice to add two more frames.
- Next, you need to set the length of time each frame will play. In the Animation palette, look below each animation frame icon for the time measurement. Clicking and holding that measurement allows you to select from a list of times for each frame. Set the time each frame should play separately to 0.5 seconds.
- Finally, you need to let Image Ready know what layer to display for each frame of the animation. Click on the second animation frame icon in the Animation palette to select it and then turn the visibility of your second text layer on in the Layers palette.
- Click the third animation frame icon in the Animation palette to select it and then turn the visibility of your second and third text layers on in the Layers palette. Your Animation palette should look like this:

- Preview your animation by clicking the Play button (
 ) at the bottom of the Animation palette.
 - To save your animated GIF, click Save Optimzed from the File menu. Image Ready opens the Save Optimized window and you can give your animated GIF a name and save it to your computer.
- Close the document in Image Ready, then return to Photoshop. You should save the original file in case you need to edit it late