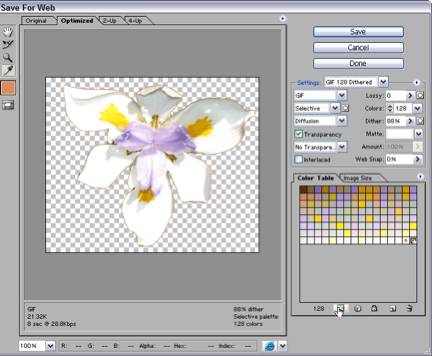
All digital images must be rectangular in shape, but sometimes you may want to create the effect of an irregular outline. You can do this by matching the background color of your image to the background color of the web page it is displayed in or by creating a transparent area in the image through which a web page background will be visible.
It is necessary to use a transparent area when you will be placing the finished image on top of a background that has a pattern or texture or on top of a photo. Note: Only GIF images support transparency.
Follow these steps to create a transparent area in your image:
- Create your graphic and crop or resize it to the desired size.
- Set the graphic’s background color to be close to the dominant color of the web page where the image will be displayed. This color should not be a color that is also contained in the areas of the graphic that won’t be transparent.
- Go to File > Save For Web. A window will open to let you preview different compression settings.
- Select either the 2-Up or 4-Up tabs. The 4-Up tab gives you four previews, as shown above. In the upper left, you have the original image.
- Select any of the other three previews and choose one of the pre-defined web GIF settings from the Settingsdrop-down menu to apply it to the preview.
- Try applying different GIF settings to each preview. Notice that each preview also shows you the approximate download time for the image at a set modem speed. Experiment to find the setting that gives you a good-looking image and a small file size. You can also alter the compression settings of any pre-set compression by changing the options shown in the Settings box.
- Select the eye-dropper tool in the left-hand tool palette and select the color in the image that you want to be transparent.
- Click the small checkered icon in the bottom of the Color Table to set the selected color to transparent. Once set to transparent, that color will be shown in the preview with a checkered background that indicates transparency.
- You can select additional colors you want to be transparent by clicking them with the eyedropper tool. It is sometimes useful to use the Zoom tool (the magnifying glass) to zoom in and make sure you are selecting the right color pixels.
- Once you’ve found a setting you like and have set your transparent colors, click the preview that looks best. A black box surrounds the preview. Click the Save button.
- Navigate to the location on your computer where you want to save the image, give it a name and hit Save.
- The image is saved as a copy. Your original image in Photoshop has not been changed to a GIF. Be sure to keep a copy of the original in case you need to use it again.


