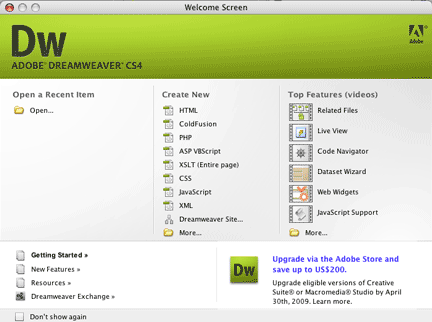
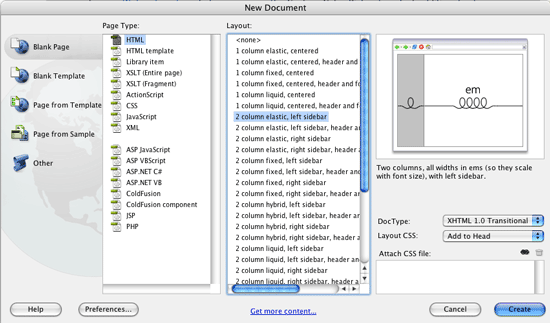
Now that you have defined a site, you should create a web page to upload as a test. From Dreamweaver, you can create a new page by clicking File, then New, and choosing “HTML” from the Basic page menu that displays. If the green Quick Start menu is visible, you can also select “HTML” from the Create New list.
If you are truly starting from scratch, we recommend creating a new document by clicking File, then New, and choosing “HTML” from the Basic page menu that displays. This will present several “prefab” design that will get you going much quicker. Flip through the different possible layouts and see the previews appear in the window on the right, then select one that looks like a good starting point for your project.
Once you have started a new page, make sure you have the Properties and Files palettes open. These palettes present the key functions you’ll likely need in a small window or windows alongside the web page you’re editing so you don’t need to scroll through menus to search for a particular function. If you don’t see Properties under the workspace (it should have a format menu, spaces for a link and target, and a number of font options), and Files on the right-hand side of the application window, use the Window menu at the top of the application to open them. These will be the palettes you use most often while working on a web page.
Saving a File
When creating web pages, save early and often. It prevents you from losing work in a sudden computer crash. It also helps ensure that Dreamweaver can correctly link your page to other pages and images on your website, particularly when you are editing a page that is already live. Choose Save or Save As… from the File menu and save the file to your local folder. Much like in Word, when you save a web page in Dreamweaver it will prompt you to name the file.
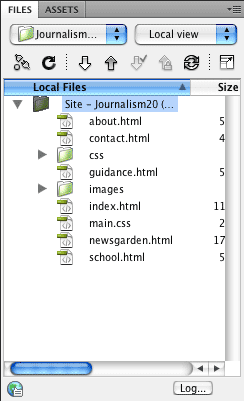
Once you save your file in your local folder, it will appear in the list of local files on the right side of the Dreamweaver Site Files window. You can open it by simply double-clicking it in this menu, or by selecting File > Open.
Page Properties
If you’re not using Cascading Style Sheets to control the appearance of your pages, you should set up every new page’s default properties — the size, font and color of its text, its background color or image, the colors of its links and so forth. You can access these options by selecting Page Properties from the Modify menu at the top of the application.
The Page Properties window includes the following categories:
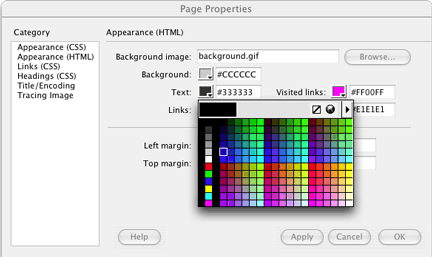
Appearance. Use the Appearance category to set the default font, size and color for your page’s text; your page’s background color or image; and the margins around your page. You can modify these items in either HTML or CSS, depending on whether or not you plan to use CSS. Dreamweaver’s color picker only uses Web-safe colors, but you can use the System Color Picker to select additional colors or directly type in a color’s hex code.
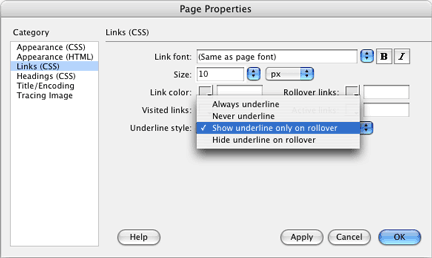
Links. The links category lets you select a standard color, font and style for every link on your page.
Headings. HTML documents have six standard heading sizes. Heading 1 is the largest, Heading 6 the smallest. You can use these headings for titles, subtitles, or other identifying text in your document. The Headings category lets you specify text size and colors for each headline and subhead.
Heading 1
Heading 2
Heading 3
Heading 4
Heading 5
Heading 6
Title/Encoding. You should always give your page a title. “Title” doesn’t refer to the file name. It’s the description that appears at the top of a web browser window when you visit a page. It should clearly describe the page in no more than 10 words. Titles can also be used to give visitors a roadmap of where they are within the overall structure of a site. Consider, for example: J-Learning: Build It: web Pages: Creating an HTML Page. It lets users know they are in the Build It section, the Web Pages chapter, and the Creating Pages, sub-chapter of the site.
Encoding refers to the language being used on your page; Western European is most common for web pages in English. You’ll probably never need to change your page’s encoding, so don’t worry about this section.
Tracing Image. If your designer uses Photoshop or another graphics program to create a mockup of pages before they’re built, you can set that mockup as your page’s tracing image. It will appear as a transparent overlay on your page, allowing you to build HTML code that matches the dimensions and appearance of the mockup. Unlike with templates, you wouldn’t work directly on the tracing image. Rather, you’d use the tracing image simply as a design guide. Remember to remove it before uploading the finished page to your web server.
Viewing Your Work
Dreamweaver offers three different ways to edit a web page: the Code, Design or Split views. At the top of the document you are editing, you will see three buttons with these labels.
- Code reveals your document’s underlying HTML code, letting you make precise changes in the code.
- Design shows how your page may appear in a web browser, making it easier to add, edit and format text and images. (If you want to test your page out on a browser other than your default browser, recall that you’ve named your file with either an .htm or .html extension. Simply open the desired test browser and open your HTML page to preview.)
- Split view lets you see both the Code and Design views simultaneously. Changes in one window are automatically made in the other (recommended).
Formatting Text
Dreamweaver lets you format web page text as easily as a word processing file. For testing purposes, Dreamweaver inserts dummy text like we’ve included below when you select a “prefab” design from File – New. You can use dummy text to copy and paste into your web page to see how it will look:
Lorem ipsum dolor sit amet, consectetuer adipiscing elit. Nulla at quam. Nam mi. Cras hendrerit wisi ut lorem. In hac habitasse platea dictumst. Maecenas nec est eu lectus auctor porta. In blandit congue nibh. Cum sociis natoque penatibus et magnis dis parturient montes, nascetur ridiculus mus. Vivamus viverra orci non nibh. Proin non dui vitae felis vulputate aliquet. Ut sodales tempor sem. Nunc elementum, velit a pellentesque facilisis, purus neque faucibus sem, ultrices consequat nisl lectus vel arcu. Donec eros. Sed facilisis blandit turpis. Vestibulum ac urna nec erat gravida viverra. Aliquam erat volutpat. Cras erat quam, vulputate quis, auctor in, vehicula sed, odio. Vivamus tincidunt ultrices magna. Mauris eu mi quis ante eleifend ullamcorper. Phasellus lacinia.
Morbi at est. Suspendisse ac nulla. Nulla dapibus congue ipsum. Sed dignissim sem eu risus. Phasellus commodo metus eget libero. Morbi ut massa. Praesent sapien. Aliquam faucibus sem eu tellus. Aenean mattis, diam nec pretium dictum, nunc lacus elementum leo, sed pharetra pede mi sodales arcu. Morbi interdum mollis lectus. Aenean diam nisl, rhoncus vel, blandit sed, tincidunt a, metus. Nunc posuere sollicitudin ante. Nullam in augue. Quisque molestie scelerisque nibh. Sed quis magna nec nulla feugiat egestas.
The Properties window underneath the web document you’re working on contains a number of buttons that should look familiar if you have ever used a word processing program like Microsoft Word. The B button applies boldface to selected text, while the I button italicizes it. The alignment buttons will right-align, left-align or center text or justify the spacing so the text will evenly abut both margins.
The Font pull-down menu lets you select a font style for selected text, while the Size menu gives you the option to change that text’s size. The Properties window also lets you change text color, implement numbered or bulleted lists and indent text.
To create a new paragraph while typing text into a Dreamweaver document in Design view, hit Enter or Return.
To create a single line break, hold down Shift and hit the Enter or Return key.
Creating a Link
As we mentioned in the Basic HTML chapter, every link is simply a series of directions telling a web browser where to look on your website to find a particular file.
Dreamweaver makes adding links easy. First, highlight the text or image you want to link from. You can click and drag your cursor to highlight text, or simply click on an image to select it. Once the content is selected, look for the Link box in the Properties palette. You can:
- Type the link location into the Link box.
- Click the folder icon next to the Link box and navigate to the location of the file you want to link your highlighted text or image to.
- Use the Point to File icon (it looks a little like a compass
 ). Click and drag to the file in the Site Files window you want to link to.
Do use: http://www.j-learning.org/
Do not use: j-learning.org
Unless you include the http://, the browser will think it is looking for a file on your website with the name j-learning.org, and will return an error when it doesn’t find one.
If you use either of the latter methods, Dreamweaver will insert the location of the link into the Link box. You can then edit it directly or use the folder or Point to File icons to make changes later.
Linking to another website: If you are linking to another website, always include the full URL in the Link box.
Linking to a page on your website: There are two ways you can link to internal web pages: relative links and absolute links.
Relative links point the web browser to a page or file using directions that are relative to the file that contains the link. It’s like giving driving directions to someone whose current location you know. The web server knows the current location of the file and can move up or down into different folders to reach the linked-to file. Look, for instance, at this link:
This link tells the web browser to ascertain the location of the file from which the link is made (the folder in your web server where you’ve uploaded your web documents), then to move from one directory to another directory called build it, and to look in that directory for another directory called web_pages. Inside that directory should be a file called basics.html. The two dots at the beginning of our example are the indicator that the web server needs to look in at least one directory within another directory to find the file. Now look at this link:
Here, the web browser expects “web_pages” to be the folder directly on your web server. If, in fact, you’ve placed “web_pages” inside another folder called “build_it,” the browser won’t know that and your page will not link properly.
Absolute linking means that you will give either the entire URL as the address, including the initial http:// and the full domain name, or that you will link to the file by directing the browser to start at the top of the website’s structure by beginning the link with a slash “/”. For instance:
Or:
Both relative and absolute linking methods are equally valid, but you may find absolute linking easier to use, especially if you have to move files around once the site is up and running. If you move a file full of relative links from one directory within your site to another, those links may no longer lead to their intended destinations.
Remember to put all your web pages in the local folder you’ve prepared for your website. If you try to link to files that are outside this folder, Dreamweaver will warn you that you have left the folder and offer you a chance to move the document you’re linking into your local folder.
Inserting other items
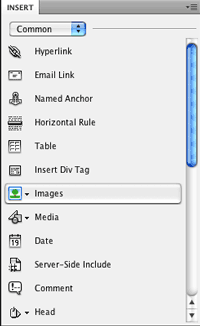
The Insert palette displays on the right side of the screen by default. Also by default, it lists the “Common” group of items to help you quickly add images, links, email address links, tables and more. You can change the group of items available from this shortcut tool by using the pulldown menu at the top.
Inserting an Image
Adding an image to a web page is a lot like creating a link. When you add an image to an HTML page, you’re just giving the web browser the address at which it will find that image. Once the browser reads the HTML, it will request that image from the web server and display it.
In Dreamweaver’s Design view, click the place in your page where you want to place the image. Select Insert > Image from the menu at the top of the application, or use the Images icon in the Common tools palette.
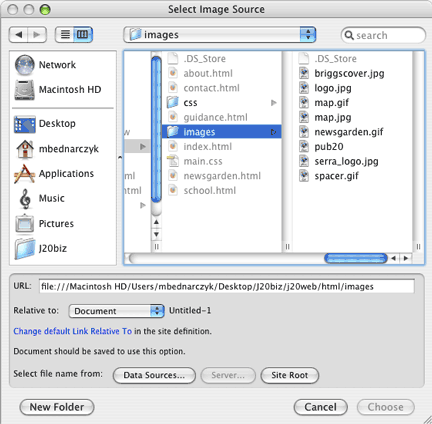
A dialog box will open, asking you to choose an image from your local graphics folder (this is the folder where you store all images you want to insert on your web page) to insert on the page. In Design view, the image will appear on the page just as it would in a browser. When you click on the image, the Properties menu will show you attributes you can edit, including:
Width and Height. Dreamweaver automatically inserts the width and height of the image in pixels. You can change either here, but we recommend against it. If you want to change an image’s size, you’ll get better-looking and more effective results by using a graphics program such as [Photoshop] before you add the image to your web page.
Source. This is the location of the image. You can type directly in the Src box to make edits, or use the File or Point to File icons to make changes, just like you did for links.
Alternate Text. The Alt text box is a place to type in a text description of the image. For instance, if you have created a graphic headline, be sure to include the text of the headline in the Alt text box. For an image, describe it: “Photo of seminar speaker.” This text will be visible when image viewing is turned off in the browser and is readable by search engines and screen readers for the blind.
Class. Use the class pull-down menu to apply an existing CSS style or to create a new one.
Link. Use this box to add a link to an image.
The Image Map tools: In the lower-left portion of the Properties palette, you will find the Image Map tools. These functions are designed to let you create different clickable areas in a single image. For example, think of a group photo in which each person’s head links to a separate biography page. Use the rectangle, circle and polygon tools to create clickable areas within an image, then assign a link to each one.
Vspace and Hspace. You can insert open space on the top and bottom (vspace) or right and left (hspace) of any image. This space is measured in pixels and will prevent text or other images from abutting too closely. Note that any space you add to one side of an image will also be added to the opposite side.
Target. A link’s target attribute answers the question, “in which window should this link open?” This is how you get a link to open in a new window, for instance. Targets are also useful when you are creating a website that uses frames, which allow you to combine more than one page of content onto a single page and lets visitors scroll multiple windows on one page simultaneously. The options are:
- _blank opens the link in a new browser window. Since frames are no longer widely used on the web, this is the target attribute you will use most often.
- _parent opens the link in the parent window, or “home base” window, of a page that is set up for multiple windows, such as with frames
- _self opens the link in the current browser window. If you don”t choose a target, it defaults to _self.
- _top is used to open the link at the top of the current frameset.
You can also create your own target names, which is a good idea when you are opening larger versions of thumbnails in a separate browser window. Instead of opening new windows for each image, give each link the same target name, and each new linked image will open in the same window.
Border. Give your image a border by entering a pixel value.
The Edit buttons: Crop, Resample, Brightness and Contrast, Sharpen. These buttons appear next to the Border field and will allow you to crop and adjust the image directly in Dreamweaver. Occasionally, these may be convenient, but it’s almost always best to edit images in an application specifically designed for that purpose (like Photoshop).
Align buttons. The align buttons will center, right- or left-align a paragraph or page. You can use these buttons much as you do in a word processing program.
Align pull-down menu. The align image attribute allows you to set alignment of the image itself, which then causes all other page content to wrap around it. For example, setting the image to right-align will push it to the right-hand margin and wrap text around it.
Previewing Your Page
Don’t forget that although Dreamweaver shows you a visual representation of your web page, you won’t know for certain how your page looks until you’ve seen it in a real browser.
In Dreamweaver, you can preview your page by hitting F12, clicking the globe icon ![]() at the top of the document window, or selecting File > Preview in Browser. Dreamweaver will open the page in a web browser and you can then check your links and your layout.
at the top of the document window, or selecting File > Preview in Browser. Dreamweaver will open the page in a web browser and you can then check your links and your layout.
You can also preview pages by simply opening them directly from a browser. Open Internet Explorer or another web browser, choose File > Open, and then open your local folder and select the page you want to preview.
Uploading Your Page
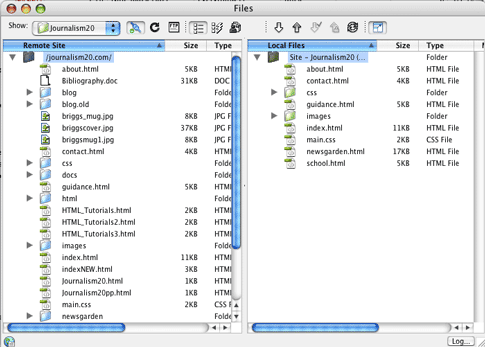
When you’ve finished editing, your final step is to put your file online. If you’re using Dreamweaver, you’ve already set up the application to know just where to put the file you’ve created. You can upload (or download) directly from the Site Files window. You can open the Site Files window by clicking the Expand/Collapse icon ![]() in the Files palette.
in the Files palette.
The icons at the top of the Site Files window will allow you to copy your files from one location to the other.
Connect. Use the Connect button ![]() to connect to your web server. Once you are connected, all your remote files (those on your web server) will appear on the left-hand side of the window.
to connect to your web server. Once you are connected, all your remote files (those on your web server) will appear on the left-hand side of the window.
Refresh. Use the Refresh icon ![]() to get Dreamweaver to refresh the file lists. If you’ve made changes or added files to your local or remote folders, the Refresh button will give you an updated view.
to get Dreamweaver to refresh the file lists. If you’ve made changes or added files to your local or remote folders, the Refresh button will give you an updated view.
View Site FTP Log. Dreamweaver automatically tracks all the files you upload and download. You can view the log ![]() later to see when a particular file was uploaded or downloaded.
later to see when a particular file was uploaded or downloaded.
The next three icons determine how you view your files in the window:
Site Files. ![]() View file names, sizes, types, modification dates and check in/out information. The site files view is the one you will use 99% percent of time.
View file names, sizes, types, modification dates and check in/out information. The site files view is the one you will use 99% percent of time.
Testing Server. If you are using a technology like Cold Fusion, ASP or JSP to test server pages, this icon ![]() will let you view the server files. (You probably won’t need this, but your server administrator will let you know if you do.)
will let you view the server files. (You probably won’t need this, but your server administrator will let you know if you do.)
Get File(s). To Get a file ![]() - to download it from the web to your local folder – select it from the remote file list on the left side of your Site Files window and then click Get File. Dreamweaver will download it to your web folder, which will be on the right side of the Site Files window.
- to download it from the web to your local folder – select it from the remote file list on the left side of your Site Files window and then click Get File. Dreamweaver will download it to your web folder, which will be on the right side of the Site Files window.
Put File(s). To Put a file ![]() – to upload a file to the web from your local folder – select it from the local file list on the right side of your Site Files window and then click Put File. Dreamweaver will upload it to your web server, which sits on the left side of the Site Files window.
– to upload a file to the web from your local folder – select it from the local file list on the right side of your Site Files window and then click Put File. Dreamweaver will upload it to your web server, which sits on the left side of the Site Files window.
Check Out File(s). If you have turned on Check In/Out you can use the Check Out File button ![]() to download a selected file from the remote server. Dreamweaver will download the file to your web folder and prevent others from editing it until you check it back in.
to download a selected file from the remote server. Dreamweaver will download the file to your web folder and prevent others from editing it until you check it back in.
Check In. Select a checked-out file from your local file list and click Check In ![]() to upload it to the web server and allow others to access it again.
to upload it to the web server and allow others to access it again.
Once you have uploaded your file, be sure to:
- Use a web browser to see how it looks on your website.
- Check to make sure the images and other files needed to build the page are also uploaded.
- Check all the page’s links to make sure they work.

