You can use a program like SWiSHmax to create attractive photo slide shows. Begin by preparing your images at the size you want them to be in the slide show using a graphics program. For this example, the images have been sized to a maximum of 400 pixels wide by 300 pixels high.
- Start a new movie in SWiSHmax, then click the Movie tab in the Objects panel.
- Set the movie width and height to the desired size. In this example, the size is set to 450 pixels wide by 350 pixels tall, 50 pixels larger than the images. Set the background color to be the desired color.
- From the File menu, select Import. SWiSHmax displays the Open window. Navigate to the location of your images, and select them. You can select multiple images by clicking and dragging the file names, or by selecting an image and holding down the Control key on your keyboard while you select the others. Click the Open button.
- SWiSHmax imports the images and places them on the stage. Notice that each image is also visible in the Outline panel and has its own layer in the Timeline panel.
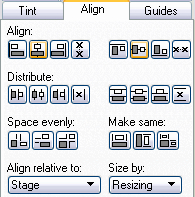 While all the images are still selected (they will all be highlighted in gray in the Outline panel if they are all selected), click the Align tab in the Objects panel. From the Align Relative To pull-down menu, select Stage, and then click the Align Horizontal Center and Align Vertical Center buttons. The images are now centered on the stage both horizontally and vertically, regardless of their size. (If not all the images are selected, simply select the first image in the Outline panel, hold down Shift and select the last image. This selects all the images in between.)
- Now you must set each image to be placed on the stage. In the Timeline panel, click Frame 1 of the first image layer. Click the Add Effect
 button, and select Place.
 - Repeat this in Frame 20 of the second image layer, frame 40 of the third image layer, frame 60 of the fourth image layer, and so on, until each layer has a place frame
 in it. Your Timeline will look like this:

- Next you must set each image to fade out once it has been viewed. Click in Frame 10 of the first layer. Click the Add Effect button, and select Fade > Fade Out. SWiSHmax places the Fade Out effect across the next 10 frames, ending the Fade Out just before the next image appears.
- Repeat this step in Frame 30 of the second image layer, Frame 50 of the third image layer, and so on. Your Timeline will look like this:

- Click the play button (
 ) in the icon menu across the top of the application to preview your animation.
 - Adjust the timing and placement of your place frames and fade outs to suit the images and pacing you want to achieve. In this example, the movie produces a slide show that changes to a new image every two seconds. This is the SWF created by this tutorial.
For long slide shows, you may want to consider creating a preloader. A preloader plays a short animation while loading the images in the background. Once everything is loaded, the slide shown begins. This prevents frustrating waits during the flow of your presentation. There is a sample preloader included with SWiSHmax that you can access by going to File > Samples > Beginner > Preloader.