Even if you are just starting out with digital photography, you should consider publishing slideshows and photo galleries when one or two photos just won’t do justice to the subject.
While there aren’t any hard-and-fast rules about how many images to use in a slideshow — it all depends on the subject and the quality of the images — a good rule of thumb is to create a slideshow if you have 6-10 quality images. Of course, many news sites create slideshows with dozens of photographs in each one, so this rule of thumb gets broken a lot.
It’s important to think about any slideshow as another version of the story you are tying to tell. Order the images so they it is logical, yet compelling. Your best image should lead the series, even if it doesn’t come first chronologically. It is considered the opening of the story and can be followed by the rest of the images in order that build the story from a beginning to an end.
This same thinking applies to a photo gallery, which is generally considered to mean a group of thumbnail images. A slideshow, on the other hand, refers to a series of images presented with continuity, usually in a Flash-based player like a movie.
Most blog software platforms make it easy to add a photo gallery. To create a slideshow, especially one with audio, additional software is needed. Photoshop Elements offers easy slideshow creation through its Bridge platform. But if you want to add audio to your story, Soundslides is the tool of choice for most multimedia journalists.
Of course, to create a compelling slideshow you need to begin planning it before you get to the publishing step. In order to present the most effective package, you will need to have been thinking about it while capturing the images. A good rule to follow is to take wide (far away) and medium shots, plus lots of tight shots (close-ups).
It’s critical to have all the shots you need when building a slideshow. Whether created with just photos or photos and audio, it should have all the elements of a good story:
- An attention-grabbing opening
- A logical progression the builds to a climax
- A walk-off or finish that provides a sense of summary
Once you have determined which photos accomplish this for a particular story, create a new folder on your computer and move the edited photos you have chosen to it.
Building a Photo Gallery in Photoshop Elements
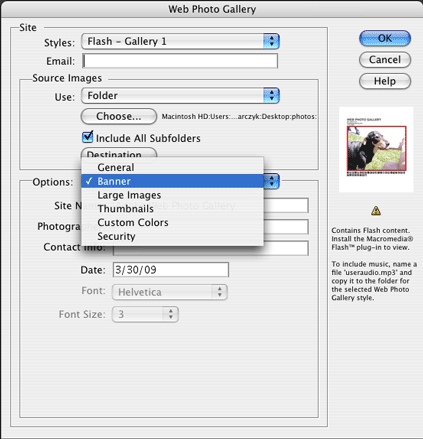
To build a photo gallery in Photoshop Elements, simply select Create Web Photo Gallery under theFile menu and follow the instructions to determine which photos to use and how they should be displayed.
1. Under Source Images select Folder and then browse to the folder on your computer that contains the photos. Then select Destination and determine where the finished product should be created. It’s a good idea to create a new folder as your destination since Photoshop will create seven different files when it builds your gallery.
2. Use the Options pulldown menu to modify the following settings:
- General: Decide between “.htm” and “.html” extsension for the final product.
- Banner: Fill in the desired title, credit and date information.
- Large images: Determine how big you want to display the images, the quality and the title.
- Thumbnails: Determine how big you want to display the thumbnail images.
- Custom Colors: Modify the colors for the background, banner, text and links.
- Security: Enter copyright information to protect your work or use this area to enter full credits for the slideshow.
3. Click OK. Admire your work.
Building an Audio Slideshow in Soundslides
When you want to add an audio to your photographs (see Chapter 7 to learn how to gather and edit audio), using Soundslides is the way to go. The basic version costs less than $50 and the Plus version is less than $100, so it’s not free, but it’s worth it if you plan to create slideshows with audio.
Without knowing any computer programming or Flash programming, you can create a Flash-based movie of pictures and sound by uploading a folder of photos and an audio file in just a few minutes.
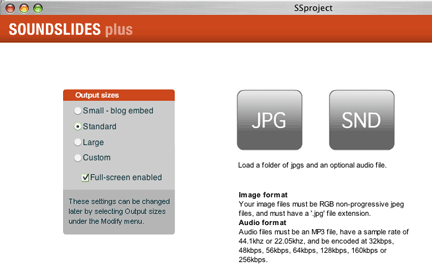
The user interface is ridiculously simple – just how it should be. The first screen asks whether you want to start a new project or work on an existing (or “old”) project.

The next screen has only two buttons: click JPG to browse and select the folder of images you will use, then click SND to browse and select the audio file you will use. You can also determine the output size, but the program allows you to do that later.
To build a slideshow, rearrange the thumbnail photos to the desired order by clicking and dragging. Then drag the bars that separate the thumbnails in the project bar below to line up the image transitions with the audio file, so the timing of the audio matches the visual from the images.
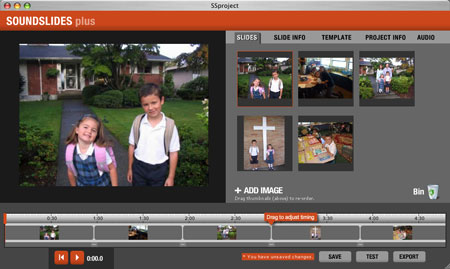
Once you timings are set, you can use the tabs along the top of the screen to add captions, modify the look and add headlines. Once you’re finished, click EXPORT and moments later you’ll have a folder called “publish_to_web” that is ready for the Web. Upload it to your Web server and link to the “index.html” file.