When Web design became a significant part of a Photoshop user’s job, Adobe added Slices to its arsenal of design tools. Slices can be used to save changes as you create graphics for the Web. Essentially, you will use Slices to divide up a Photoshop document. Each “Slice” gets saved as a different image when you Save for Web.
Slices are especially useful for Web designers who mock up entire Web pages in Photoshop during the design process, and then want to export the graphics and the HTML code needed to reproduce the mock-up as a Web page. For example, this Web site was mocked up in Photoshop, tweaked and re-tweaked, and finally sliced up to produce the individual images that make up the site.
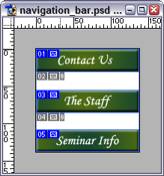
Slicing is also very handy for creating a graphical navigation bar, since it’s easier to keep your graphics and buttons in a single Photoshop file.
Here’s a quick tour to using Slices:
- Open a Photoshop document that you want to slice up.
- Click the Slice tool (
 ) in the toolbox, and click and drag into your document to draw a rectangular slice. Photoshop automatically numbers your slice and creates a brown slice outline around the area you selected.
 - Adjust the handlebars on the Slice to make it the right size.
- Click and drag to define a second Slice.
- Outlined in blue will be Slices that you are not currently working on. To edit another Slice, select the Slice Selection tool (
 ) in the toolbox (you can access it by clicking and holding the Slice Tool in the toolbox) and then click the Slice you want to edit.
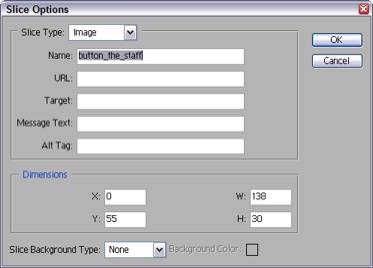
 - If you plan to export HTML as well as images, you can double-click on a Slice to open the Slice Optionswindow, which allows you to set certain HTML settings and give the image a file name. You can also resize the image using the Slice Options window.
- When you have defined all your Slices and set up your Slice options, choose Save for Web from the Filemenu.
- You can select each Slice individually and give it a setting from the settings menu. (For more help on Saving for Web, see the section titled Creating Web-formatted images.
 When you are finished, click Save. (Notice the options available at the bottom of the Save box. Set these to save HTML and images or only the images from your file. You can also set Photoshop to save only Slices you selected in theSave for Web window or to save All Slices.)
- Click Save. Unless you changed the settings, Photoshop saves the images in an HTML file that contains the code to build the document and the images in a separate folder. Open this up in your HTML editor to make any necessary tweaks.