In the next sections, you will get a look at digitizing and editing video using Adobe Premiere Pro, which includes most of the editing tools you need and has good integration with digital video – the best type of video for the web. The ideas and concepts you learn here should be adaptable to most video-editing software. You can download and try both Adobe Premiere Pro and Adobe Premiere Elements for 30 days from the Adobe website. Other software to consider:
- Apple’s iMovie, which comes standard on Mac computers or is available in the iLife suite
- Final Cut Pro has full-featured power like Premiere. There is also Apple’s latest version, Final Cut Pro Xwhich has the more user-friendly imovie feel to it with more tools.
- Windows Movie Maker (Development of Windows Movie Maker was abandoned after the release of Windows Vista; its replacement, Windows Live Movie Maker, will be included with Windows Live Essentials, a free download from Windows Live; however Microsoft has stated that Windows Live Movie Maker will not have the same features as Windows Movie Maker. Source: Wikipedia)
Capturing / Digitizing
When you digitize video, you turn it from its analog form (captured on a tape or from a live feed) and turn it into digital form.
Both forms are “electronic,” but only digital video is a series of 1s and 0s that can be copied, manipulated, stored and later retrieved without any loss of data.
A similar term, “capturing,” is often used interchangably with “digitizing” but more specifically refers to the act of diverting or receiving an analog video feed into a digital editing system, and does not refer to the converting process.
Wikipedia has more on the process of digitization. It is not if you are using a digital video camera since those devices record natively in a digital format.
Another option for recording video is using flash memory cards. The flash memory card eliminates the needs for digitizing footage and downloads footage to your video editor much faster. More information on flash memory cards can be found here.
Adobe Premiere files are saved as .ppj files, but that’s just the file that contains your edits and effects. The video you digitize is saved separately. If you later move your .ppj video files to another computer, you’ll need to move any captured video as well, since those files are actually external to the .ppj.
All projects captured with a FireWire cable from a digital camera should be Standard 48kHz from the DV – NTSC Presets that Adobe Premiere makes available.
If you have an older computer, you shouldn’t run any other applications on your computer when you are using Premiere because of the processing power required by digitizing.

Getting Familiar with the Workspace
Using Premiere is a matter of working with the three main windows: Project, Monitor and Timeline.
Project window
In the Project window you store and organize your video clips. This window lists the clips you digitize, but does not contain the clips themselves. This keeps the project small and it means that the clips you’ve captured won’t be altered. They’ll remain just as you captured them on your hard drive.
A bin is a folder that holds your clips. You can keep all your clips in one bin, organize them in several bins, or have separate bins for different interviews, audio and graphics. It’s up to you. You can create a new bin by hitting the folder icon at the bottom of the Project window. You can move clips into bins by dragging and dropping.
Monitor window
The left side of the Monitor window shows the current frame at which the playback head in the Timeline is sitting; this is the Program view.
In the right side of the Monitor window you can see the Source view, which displays the current clip you are working on, whether it is already in the Timeline or only in the Project window. Double-click on a file you want to work on from the Project window to open it in the Source view.
The controls under each side of the Monitor window control what is being displayed. You can play and stop. You can also see the time code here, which is useful for exact editing.
Timeline window
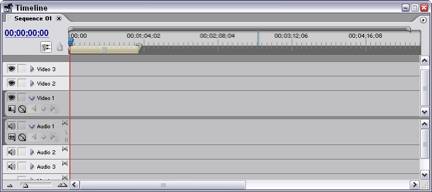 This is where you drag your video clips and lay them in the order you want them to play. This is also where you drag your audio clips (if separate from video clips). You also add titles and transitions here.
When you add a video clip to the Timeline, put it into the Video 1 track. Audio attached to the clip will be laid into Audio 1. You can lay subsequent video, transitions and titles into Video 2 and Video 3.
Video is stacked. Whatever’s on top blocks out what’s underneath. So titles in Video 2 block out part of the picture (the stuff behind the letters) in Video 1. You can add additional video and audio tracks by right-clicking on the existing track names and selecting Add Tracks.
Video in a track on top of another plays over that picture, but audio is blended, so whatever you have in your audio tracks (up to 99 tracks total) will all be played together with the video.
To keep audio but turn off video, click on the eyeball next to the track name. To keep the video but turn off the audio, click on the speaker icon next to the track name.
![]() To zoom in and out of your Timeline, which gives you better control over frames when you are working on transitions, click on the Time Box slider at the lower left. You can zoom in so that the timeline displays the clip one frame at a time (sometimes useful for editing audio), or you can zoom all the way out to 8 minutes (useful for very long video projects).
To zoom in and out of your Timeline, which gives you better control over frames when you are working on transitions, click on the Time Box slider at the lower left. You can zoom in so that the timeline displays the clip one frame at a time (sometimes useful for editing audio), or you can zoom all the way out to 8 minutes (useful for very long video projects).