Most digital cameras take photographs that can be put onto your Web site just as they are — without being touched up. Some photos, however, will be greatly improved if their color and contrast are tweaked.
While photo-editing tools can dramatically improve your images, each tool works slightly differently. Moreover, since every image is different, how you make adjustments will change for each image. With practice, you will come to know what tools will make the best corrections.
Adjusting Levels
In the full Photoshop version, the Levels tool adjusts an image’s tonal range and color balance. By moving the sliders that influence the intensity of shadows, mid-tones and highlights, you can bring out background detail, lighten shadow on a face or brighten the overall image. You can choose to tweak the Levels settings yourself or take advantage of the Auto Levels feature, which makes a best-guess adjustment to an image. (Note: only the Auto Levels function is available in Photoshop Elements.) TheLevels tool remaps a photograph, creating settings for its darkest point and setting the lightest point to white. All points in between are then remapped relative to the new dark and light settings.
Here’s how:
- Open your image. Choose Image > Adjustments > Auto Levels. Photoshop makes an automatic adjustment. If it looks good, you’re all set. If it doesn’t, select Undo Auto Levels from the Edit menu and move to step 2.
- Choose Image > Adjustments > Levels. Photoshop opens the Levels menu.
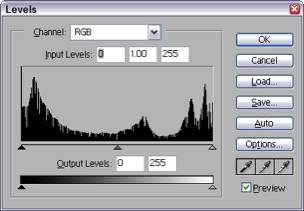
The Levels window shows a histogram for the image – a visual map of its color distribution. The left side of the histogram shows darks, the middle shows mid-tones, and the right shows highlights.
- You can make adjustments in a couple ways. (Be sure the Preview box is checked so that you can see the effects of your adjustments):
- Select one of the eyedropper tools and click an area of the image that corresponds to the eyedropper’s color (black, grey, white). Photoshop adjusts the image relative to the point you clicked.
- Adjust the input level sliders to make changes to the image.
- Adjust the output level sliders to make changes to the image.
- When you are happy with your image, click OK.
Adjusting Brightness/Contrast
Sometimes all your image needs is a little work on the contrast — the intensity between areas of black and white. Increasing contrast can heighten the drama of an image by making blacks blacker and whites whiter. Decreasing contrast can make an image more readable.
Here’s how:
- Open your image. Choose Image > Adjustments > Auto Contrast. Photoshop makes an automatic adjustment. If it looks good, you’re all set. If it doesn’t, select Undo Auto Contrast from the Edit menu and move to step 2.
- Choose Image > Adjustments > Brightness/Contrast. Photoshop opens the Color Balance window.
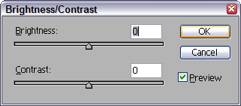
- Make sure the preview checkbox is selected so that you can see your edits as you make them.
- Move the Brightness and Contrast sliders to improve your image.
- When you like what you see, hit OK.
Adjusting Color
Sometimes photographs have a particular color cast – maybe a little too much blue or a tinge of yellow. This is especially common when you take photographs under artificial lighting. Adjusting the amount of a specific color can rescue your good images.
Here’s how:
- Open your image. Choose Image > Adjustments > Auto Color. Photoshop makes an automatic adjustment. If it looks good, you’re all set. If it doesn’t, select Undo Auto Color from the Edit menu and move to step 2.
- Choose Image > Adjustments > Color Balance. Photoshop opens the Color Balance window.
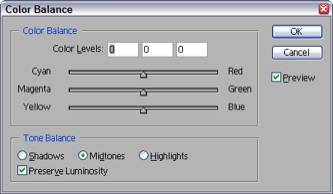
- Make sure the preview checkbox is selected so that you can see the effect of your adjustments as you make them.
- Move the sliders away from the color you want to decrease in your image. You can adjust all three sliders to get the effect you want.
- If desired, select and adjust the sliders for the shadows, mid-tones, and highlights. This can be a great way to bring out the blue in a washed-out sky.
- Click OK when you are happy with your work.