Foreground and Background Colors
![]() The foreground color (the box shown in black in the toolbar screenshot) is used by the current drawing tool – it’s the active tool. The background color is used to fill in erased areas and to create gradient fills.
The foreground color (the box shown in black in the toolbar screenshot) is used by the current drawing tool – it’s the active tool. The background color is used to fill in erased areas and to create gradient fills.
To set the foreground and background to 100 percent black and white, click the small boxes next to the foreground and background color boxes in the Tool Palette. To switch the foreground and background colors, click the small arrows next to the foreground and background color boxes.
You can choose new foreground and background tools by clicking once in either the foreground or background box to bring up the Color Picker.
In the Color Picker you can select a new foreground or background color by:
- Selecting it from the color box in the middle, sliding the arrows in the narrow color bar next to it to get a new color range. The color you select is displayed in comparison to the old color in two boxes to the right of the color boxes.
- Setting the HSB values (angle from 0 to 360 for hue, percentages of saturation and brightness).
- Setting the Lab values (Lightness values on the (a) green to magenta and (b) blue to yellow axes.)
- Setting the RGB values (values from 0 to 255 of red, green and blue).
- Setting the CMYK values (percentages of cyan, magenta, yellow and black). CMYK is the color mode used for print graphics.
- Set the hexadecimal value. (See the Color section for details)
- At the bottom of the Color Picker you can limit your palette to only Web-safe colors by checking the box.
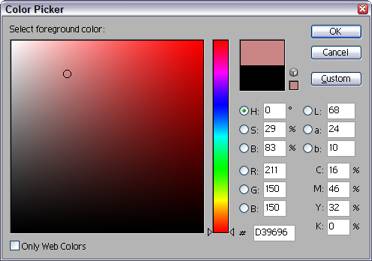
All Web graphics are created in the RGB mode, so you will probably find yourself using the RGB and hexadecimal values more than any of the others.
Editing Modes
Edit in Standard Mode. Work normally.
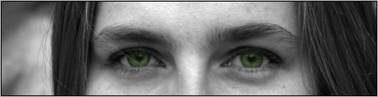
Edit in Quick Mask Mode. A mask lets you select an area of your document that is (or isn’t) affected when you make color changes, use patterns, adjust colors or set gradients. Here’s a quick example:
- You have a black and white image of a face. You want to give the eyes color to create an eerie effect.
- To do this you need to colorize a part of the image, so you need to isolate the irises of the eyes from the rest of the face. To do this, use any of the selection tools to select the irises.
- Then, switch to Quick Mask mode. Photoshop fills everything but your selection with a 50% red screen to indicate that it is protected.
- Using the Brush tool, anywhere you paint with white is added to your selection. Anything you paint with black is removed from your selection and covered with the 50 percent red screen.
- When you switch back the Standard Editing Mode, your selection, plus any additions you made in Quick Mask mode, are still selected.
- Next, use one of the tools discussed in the Editing photographs section to colorize and adjust your selection.
Screen Modes
These modes control the way Photoshop looks on your screen:
- Standard Screen Mode. Shows all Photoshop menus across the top of the application window and vertical and horizontal scrollbars as needed.
- Full Screen Mode with Menu Bar. The document you are working on is displayed full-screen on a grey background in the center of the window, and application menus are displayed across the top of the application window.
- Full Screen Mode. The document you are working on is displayed full-screen on a black background in the center of the window.
Choose the screen arrangement that best suits your working style.
Jump to Image Ready
Image Ready is a program integrated with Photoshop that allows you to add animation effects to your Photoshop images. This is covered in the section titled Creating Animated GIFS with Image Ready.
A Few More Handy Tools
- Transform. To resize an object or selection, choose Transform from the Edit menu. You can transform using scale, skew, distort, perspective, rotate 180º, rotate 90º clockwise, rotate 90º counter-clockwise, flip horizontal and flip vertical.
- Stroke. To outline a selection, first select the object you want to outline with the wand or other selection tool. Once the change is made you an deselect your selection by going to Select > Deselect. Then, chooseStroke from the Edit menu. You can set the color and position of the stroke.
- Select. The Select menu has a range of choices you can use to affect a currently selected area of your document. You can select the inverse, feather the edges of your selection, grow your selection and select areas of similar color in your document.