If you have ever drawn an illustration with pencil and paper, you’re familiar with the limitations of drawing an object on top of another object. When you change your mind later about it’s placement, the “topmost” object must be erased – and when you erase the top object you also erase what’s underneath.
In Photoshop, the same effect happens. If you use the Brush tool to lay color on top of another element you created with the Brush tool, the two areas merge. When you want to move one, you are stuck having to erase and redraw – unless you use layers.
Think of layers as layers of transparent paper. Draw each brush stroke on its own layer, and they stay separate, even though they visually overlap each other. When you need to move a brush stroke, you select the layer it is on and move it independently of the other layers.
 You can duplicate layers, reorder them to move one object on top of another and delete layers. You can even make a layer temporarily invisible so that you can work easily on what’s underneath it.
Best of all, there are a whole set of effects you can apply to layers to overlay a pattern or gradient or create a stroke or drop shadow.
When you use some Photoshop tools, a new layer is created automatically. This is true when you use any of the Shape tools, create text or paste something from the clipboard.
Most of the magic happens in the Layers palette, which shows you all the layers in a document. To open the Layers palette, select Layers from theWindow menu.
It takes a little practice to get used to using Layers, but you’ll be glad you spent the time to learn this Photoshop function. It will save you time in the future when you need to revise an illustration, and time while you are designing an illustration as you tweak and re-tweak.
 Selecting layers
When you select a layer, you can use the Move Tool to move the contents of that layer independently of other others. To select a layer, simply click it in the Layers palette.
Creating a layer
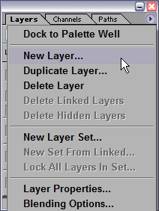
If you want to create a new layer, simply click the tiny arrow icon in the upper-right corner of the Layers palette and choose New Layer from the menu that appears.
Duplicating layers
If you want to duplicate a layer, select it by clicking the layer you want to duplicate. Then, click the tiny arrow icon in the upper-right corner of the Layers palette, and choose Duplicate Layer from the menu that appears.
Deleting layers
If you want to delete a layer, select it by clicking on the layer you want to delete. Then, click the tiny arrow icon in the upper-right corner of the Layers palette, and choose Delete Layer from the menu that appears.
Turning visibility on and off
To temporarily hide a layer, click the layer visibility icon next to the layer. If the eye is invisible, so is the layer.
Naming layers
To name a layer – and this gets handy when you have dozens – simply double-click the text next to the layer thumbnail and type the new name.
Linking layers
When layers are linked, they move together when you move one layer with the Move tool. You can link layers by selecting one of the layers you want to link and clicking the empty box between the layer thumbnail and the layer visibility icon. A small chain will appear showing that the layer is linked.
Reordering layers
When you want an object on one layer to look like it is on top of an object on another layer, you need to change the order of the layers. Those at the top of the Layers palette are “on top” of those below. To reorder a layer, go to the Layers palette and click and drag the layer you want to move to the new location you want to put it in.
Apply effects to layers
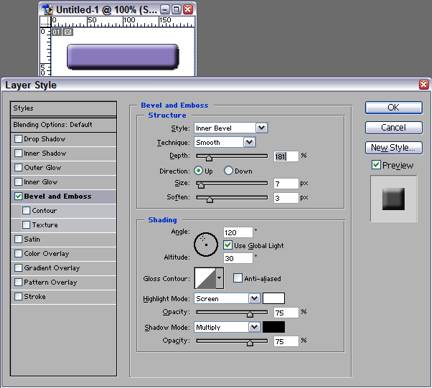
You can experiment with an array of effects you can apply to each layer. To open the Blending Options menu, double-click on the layer you want to affect. You can also right-click on the layer thumbnail to open the Blending Options menu. Here’s a quick example:
- Using the Rounded Rectangle tool, draw a small rectangle in your document.
- Right-click on the layer thumbnail for your new rectangle in the Layers palette. Photoshop opens theBlending Options menu.
- Select Bevel and Emboss from the Styles listed on the left-hand side of the window.
- Adjust Depth, Size and Soften and watch the effect these adjustments have on your rounded rectangle. When you are happy with the look of your new button, click OK to close the Blending Options menu. The new effect is shown underneath the layer in the Layers palette. You can turn it off if you decide you don’t like it.